In 2019, three different departments set a goal to launch new Linode GPU instances for customers by Linode’s birthday. Between the hardware, marketing, and management teams, we weren’t sure if that was possible, especially with the other products we were working on during that period.
So we chose the one team that stood a chance of making this happen: a handpicked team of eager employees spanning multiple departments to form Team Mission GPU. Now, almost two years ago and many many GPU instance deployments later, we’re taking a trip down memory lane to provide in-depth insight on how we made that happen– and turned an idea into a successful product we are actively expanding.
A Brief Background on the History of Virtualization at Linode
Before we get started with how we launched GPU instances, here are some lightweight technical details and the history of how virtualization started at Linode before we became the cloud provider you know about today.
Linode started as a small business in 2003 providing virtual machines running UML (User Mode Linux), an early virtualization paradigm similar to Qemu (Quick EMUlator). UML provided fully virtualized hardware. When a customer logged into their Linode, the devices that a customer saw, such as disks, network, motherboard, RAM, etc., would all look and behave like real hardware devices, but the devices were actually backed by software instead of the real hardware.
Several years later, Linode moved to Xen as its virtualization layer to provide the latest performance improvements to our customers. Xen is a type1 hypervisor, meaning the hypervisor runs directly on the hardware, and guests run on top of the Xen kernel. The Xen kernel provides paravirtualization to its guests, or the hardware interfaces that the Linode sees are translated to actual machine calls through the Xen kernel and returned to the user. The reason this translation layer exists is to provide security and other safety features so that the right instruction goes to the right Linode.
Several years after that, a new technology was being developed called KVM (Kernel Virtual Machine). KVM consists of parts of the Linux kernel that provide paravirtual interfaces to CPU instructions. Qemu is one of the virtualization technologies that can take advantage of KVM. Linode decided to switch again for the benefit of our customers. When customers took the free upgrade to KVM most workloads saw an instant increase in performance. This type of paravirtualization is different than Xen: the CPU instructions pass from the guest (Qemu) to the host kernel and directly to the CPU using the processor level instructions, allowing near native speeds of execution. The results of those instructions are returned to the Linode that issued them, without the overhead that Xen requires.
So what does all of this have to do with Linode GPU instances?
Linode conducted market research and tried to determine what would provide the best value to customers interested in running GPU workloads. We decided to provide the GPUs directly to customers using a technology called “host passthrough.” We tell Qemu which hardware device we would like to pass through to the guest, in this case the GPU card, and Qemu works in conjunction with Linux to isolate the GPU card so that no other process on the system can use it. The host Linux machine can’t use it, the other Linodes on the machine can’t use it either. Only the customer who requested it can use the GPU card, and they get the full card. The actual hardware device is passed through, unaltered and not paravirtualized, meaning there is no translation layer.
Week 1: Hardware Arrives at Linode
With the research complete, the whole team decided to move forward with the project. In order for the plan to work, the system required a few changes throughout the entire low level stack. The hardware came online on Monday and we had five days to decide whether or not to move forward with a large order for a datacenter to meet the deadline.
Everyone involved had the same understanding, if we were not able to get it to work in a regular 40-hour work week, we would not move forward. This meant there was no pressure to do overtime, but we only had five days to determine the future of a new Linode product.
So what ended up happening? It turns out all our research paid off. We tried following some existing documentation, and it worked exactly as expected. Within days, we were able to reliably attach GPUs to Linodes in a test environment. By Friday, we were confident we could pull this off. The test was successful! Now it was time to place a large order for customers and move forward.
Week 2: Make Hardware Interface Layer Work with GPUs
After a successful initial test, we came into the office on Monday recharged and ready to integrate the GPU attachment process with our existing Linode creation workflows. We try to make our interface as simple as possible: just a couple clicks to deploy a Linode, and a lot goes into those few actions that we had to account for.
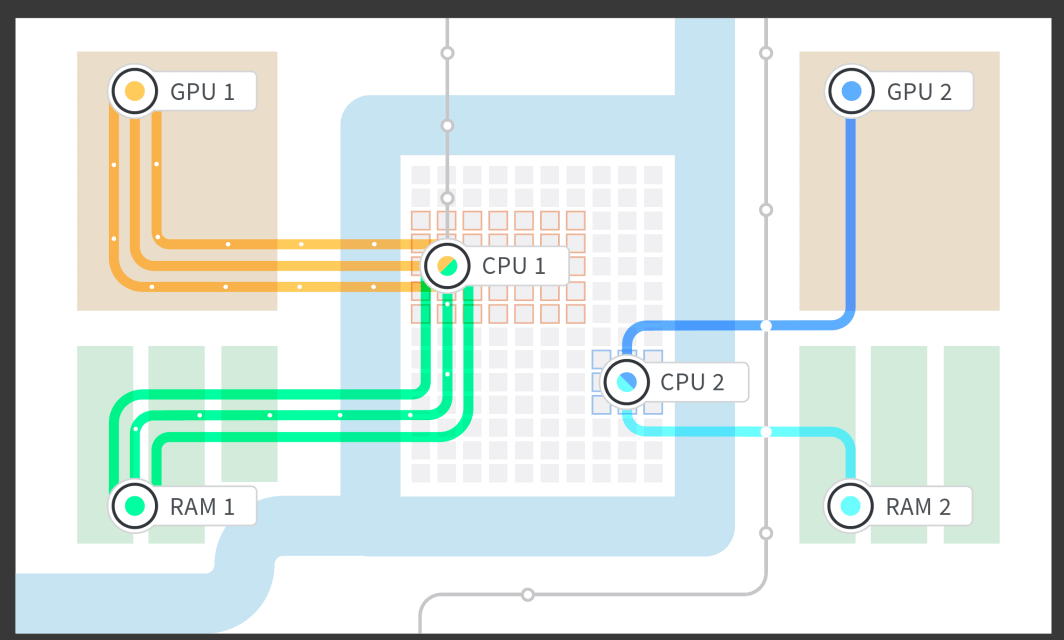
In order to make GPUs possible, several low level parts had to be written and implemented, such as isolating the RAM for the GPU and the Linode, as well as giving the Linode dedicated CPU cores that were paired with the isolated RAM and the GPU. We researched the NUMA (Non Uniform Memory Access) architecture of the motherboard and we were able to isolate the NUMA group of RAM to the CPU it was most closely associated with, and the NUMA group that was attached to the PCIe (PCI [Peripheral Computer Interface] express) lane that the GPU was plugged into. This allowed us to boot a Linode with 1, 2, 3, or 4 GPUs attached, and take up the part of RAM and the CPU cores that were closely associated with the GPU card based on the motherboard structure.

After the hardware layer was done, we worked on interfacing with the Linode Job Queuing mechanisms so that we could boot Linodes through our Cloud Manager and API. At this stage, we were able to start testing for reliability. The last thing we wanted was an on-call engineer to be paged in the middle of the night because of a failed system, or have a system go down in the middle of the workday for a customer in a different timezone. With both customers and engineers’ sleep schedules in mind, we started testing early, and continued to make sure customers ended up with a solid and reliable product.
Week 3: Make Administrator Interface and Accounting Changes
In week three, we had some administrative questions ahead of us: How do we track which customers are assigned to which Linodes? How do we send customers to a Linode instance with a GPU, and not to a Linode instance without a GPU?
All of the tracking and control had to be implemented. We did this so that we could account for how many GPU cards we had, how many were taken, how many that were empty, and how many we could still sell to new customers. We also had to build this GPU tracking into our internal administrator interfaces. This might seem like boring accounting work, but a lot of ingenuity was required from the whole team, and from outside team members, to interface this new product with all of our existing products, without requiring manual steps.
Thankfully, we pulled everyone together and we were able to write the code and test it to make sure it worked well, worked reliably, and didn’t require manual intervention to get a Linode GPU instance up and running. Another side benefit of doing this work at this stage was that testing was easier. We simply had to click a single button on our administrator interface to bring up a Linode GPU instance.
Week 4: Make Public API Changes So Customers Can Spin Up Linodes
After making the administrator interface button to bring up a Linode GPU instance, we were feeling pretty good. Now, we needed to work on exposing this same functionality to customers. The public API is backed by Python, which made the code extremely intuitive. We were able to roll the changes out and test them very quickly. The tricky part was making this feature available within the company for testing, but not available outside the company until we’d done the necessary testing for reliability purposes.
Week 5: Deploy! Or, How to Deploy a Public-Facing Feature Behind a Feature Flag
We were coming down to the wire, so we posed the question: how are we feeling about launching this to the public and ultimately having customers use this new service?
The answer was to handle all of the unknowns early on and account for them by deploying early, and often. While we were still testing some of the use cases on the team, we deployed Linode GPU instances to the public, but hidden behind a feature flag. We were able to test GPUs on our employee accounts and this allowed us to make sure things would behave exactly as expected if a customer were to use it. Any time we found something we weren’t expecting, we made a fix and made a public deployment.
Slowly but surely, and deploying code almost every day, we resolved everything on our list. We ran out of changes to make and felt confident in truly opening this up to customers.
Week 6: Test! Open GPUs to Linode Employees
One of the great things about working at Linode is that we get to play with cutting edge technology before anyone else. (P.S. we’re hiring!) Every employee has a chance to put a new product through its paces so that every piece of tech we launch has been battle tested. Any employee could sign up to test out a Linode GPU instance during work hours, even after work if they really wanted to, to use the Linode GPU instance as a customer would. All they had to do was tag their employee account and spin up a GPU.
Here are some of the ways Linodians tried our new GPUs:
- Cloud gaming – where the game runs on the Linode GPU instance and the video and controls are sent over via Steam Link™
- 3D rendering
- Video transcoding
- Password strength testing
- Running TensorFlow
After this stage we collected performance metrics and decided we were ready to go to production and Launch to customers.
Launch!
We launched! We celebrated! There was ice cream and swag! Customers started trying out the product that had been in development only a few short weeks ago. The best part was that everything worked on launch day. We didn’t have to make any last minute changes, there were no fires to put out, customers were happy, and everything worked reliably.
The actual code launch wasn’t difficult. From a code and system configuration perspective, all it took to launch GPUs into production was the removal of a feature flag. But there are also tons of other things that go into a product launch at Linode: technical documentation, making the UI changes in the Linode Cloud Manager, and all the fun marketing materials to help celebrate our new product.
Post Launch: No Code Changes for Six Months
Some questions are always on our mind: did we do enough testing? Was six weeks too fast?
In our case it was just the right speed: I haven’t had to touch the code since launch. And, Linode GPUs have seen customer usage every single day. It’s great when you can build a product and have it work, and then go on and build other great products, and that thing that you built two years ago is still running, all by itself, with minimal interaction needed
In retrospect, here are some things that allowed us to be this successful:
- Do research ahead of time – This helped us out greatly in tackling all of the unknowns that we could without actually having hardware in hand.
- Make a plan – We had a very detailed plan and each step had to be executed on time or we wouldn’t have been able to launch.
- Stick to the plan – Focus on the task at hand and keep in mind the remaining tasks that need to be done.
- Have a good management team – Make sure that all levels of management have the understanding that if a project with a tight deadline misses one step the launch deadline will not be met. This may be the most important part that allowed us to succeed. Some pressure is a good thing, as it was in our case, too much pressure leads to burn out and failure. After discussing the timeline with management they were completely on board.
- Support each other – The one team that stood a chance wouldn’t have stood a chance without the entire supporting structure of the rest of the organization. When all your coworkers want you to succeed they will all jump in and help out if you need them to.
- Test – Test test test test, if I could type it out one more time, I’d still say test. Both automated and manual testing. This was, by far, the main reason that nobody on my team had to touch the code in over 6 months.
Learn more about Linode GPU instances by checking out our GPU documentation, and we just expanded GPU availability in our Newark, Mumbai, and Singapore data centers.
Interested in trying Linode GPUs for your current workloads? You can get a free, one-week trial to see how our GPUs work for you. Learn more here.
(And again, if you want to help us build and test products like Linode GPUs, we’re hiring!)


Comments (1)
how to make windows os in linode