Product docs and API reference are now on Akamai TechDocs.
Search product docs.
Search for “” in product docs.
Search API reference.
Search for “” in API reference.
Search Results
results matching
results
No Results
Filters
Deploy Odoo through the Linode Marketplace
Quickly deploy a Compute Instance with many various software applications pre-installed and ready to use.
Odoo (formerly known as OpenERP) is a self-hosted suite of over 10,000 open source applications for a variety of business needs, including CRM, eCommerce, accounting, inventory, point of sale, and project management. These applications are all fully integrated and can be installed and accessed through a web interface, making it easy to automate and manage your company’s processes.
Deploying a Marketplace App
The Linode Marketplace lets you easily deploy software on a Compute Instance using Cloud Manager. See Get Started with Marketplace Apps for complete steps.
Log in to Cloud Manager and select the Marketplace link from the left navigation menu. This displays the Linode Create page with the Marketplace tab pre-selected.
Under the Select App section, select the app you would like to deploy.
Complete the form by following the steps and advice within the Creating a Compute Instance guide. Depending on the Marketplace App you selected, there may be additional configuration options available. See the Configuration Options section below for compatible distributions, recommended plans, and any additional configuration options available for this Marketplace App.
Click the Create Linode button. Once the Compute Instance has been provisioned and has fully powered on, wait for the software installation to complete. If the instance is powered off or restarted before this time, the software installation will likely fail.
To verify that the app has been fully installed, see Get Started with Marketplace Apps > Verify Installation. Once installed, follow the instructions within the Getting Started After Deployment section to access the application and start using it.
Configuration Options
- Supported distributions: Ubuntu 22.04 LTS
- Recommended plan: All plan types and sizes can be used.
Odoo Options
- Email address (required): Enter the email address to use for generating the SSL certificates.
Limited Sudo User
You need to fill out the following fields to automatically create a limited sudo user, with a strong generated password for your new Compute Instance. This account will be assigned to the sudo group, which provides elevated permissions when running commands with the sudo prefix.
Limited sudo user: Enter your preferred username for the limited user. No Capital Letters, Spaces, or Special Characters.
Locating The Generated Sudo Password A password is generated for the limited user and stored in a
.credentialsfile in their home directory, along with application specific passwords. This can be viewed by running:cat /home/$USERNAME/.credentialsFor best results, add an account SSH key for the Cloud Manager user that is deploying the instance, and select that user as an
authorized_userin the API or by selecting that option in Cloud Manager. Their SSH pubkey will be assigned to both root and the limited user.Disable root access over SSH: To block the root user from logging in over SSH, select Yes. You can still switch to the root user once logged in, and you can also log in as root through Lish.
Accessing The Instance Without SSH If you disable root access for your deployment and do not provide a valid Account SSH Key assigned to theauthorized_user, you will need to login as the root user via the Lish console and runcat /home/$USERNAME/.credentialsto view the generated password for the limited user.
Custom Domain (Optional)
If you wish to automatically configure a custom domain, you first need to configure your domain to use Linode’s name servers. This is typically accomplished directly through your registrar. See Use Linode’s Name Servers with Your Domain. Once that is finished, you can fill out the following fields for the Marketplace App:
- Linode API Token: If you wish to use the Linode’s DNS Manager to manage DNS records for your custom domain, create a Linode API Personal Access Token on your account with Read/Write access to Domains. If this is provided along with the subdomain and domain fields (outlined below), the installation attempts to create DNS records via the Linode API. See Get an API Access Token. If you do not provide this field, you need to manually configure your DNS records through your DNS provider and point them to the IP address of the new instance.
- Subdomain: The subdomain you wish to use, such as www for
www.example.com. - Domain: The domain name you wish to use, such as example.com.
") within any of the App-specific configuration fields, including user and database password fields. This special character may cause issues during deployment.Getting Started after Deployment
Accessing the Odoo App
Open your web browser and navigate to
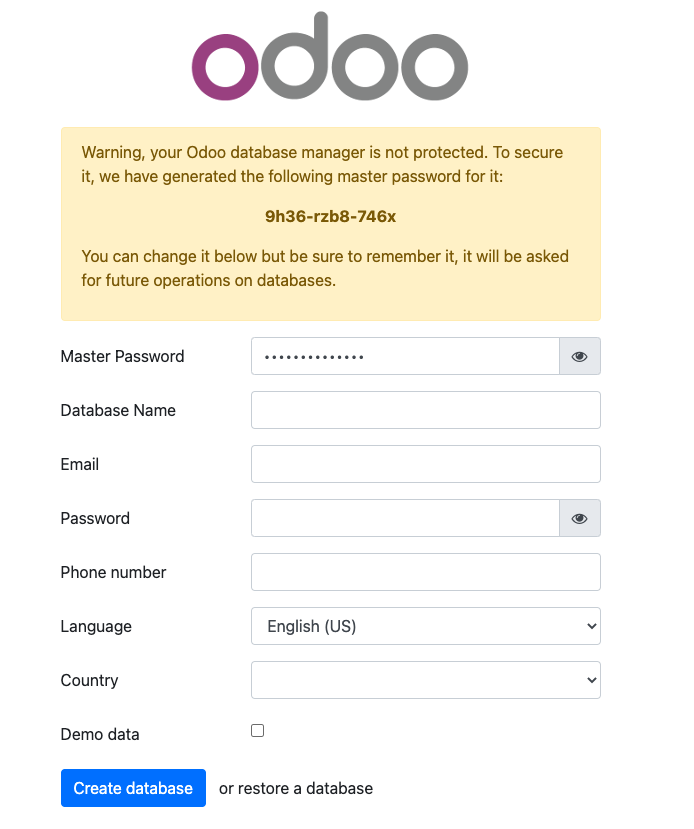
https://DOMAIN/, where DOMAIN can be replaced with the custom domain you entered during deployment or your Compute Instance’s rDNS domain (such as192-0-2-1.ip.linodeusercontent.com). See the Managing IP Addresses guide for information on viewing rDNS.Within the Odoo setup page that appears, save the automatically generated admin password (also called the master password), enter odoo as the Database Name, and fill out the remaining details for your account.

Now that you’ve accessed your dashboard, check out the official Odoo documentation to learn how to further use your Odoo instance.
More Information
You may wish to consult the following resources for additional information on this topic. While these are provided in the hope that they will be useful, please note that we cannot vouch for the accuracy or timeliness of externally hosted materials.
This page was originally published on

