Product docs and API reference are now on Akamai TechDocs.
Search product docs.
Search for “” in product docs.
Search API reference.
Search for “” in API reference.
Search Results
results matching
results
No Results
Filters
How to Install LibreNMS for Network Monitoring
Traducciones al EspañolEstamos traduciendo nuestros guías y tutoriales al Español. Es posible que usted esté viendo una traducción generada automáticamente. Estamos trabajando con traductores profesionales para verificar las traducciones de nuestro sitio web. Este proyecto es un trabajo en curso.
LibreNMS is an open-source network monitoring tool with a wide range of features including auto-discovery, alerting, extensive distribution support, and support for multiple networking protocols. In this guide, learn how to set up a LibreNMS instance with Docker, how to deploy agents for monitoring, and how to navigate the interface.
How to Install LibreNMS
LibreNMS provides two main installation methods. The first involves manually installing and configuring LibreNMS and all of its dependencies, including a MySQL/MariaDB instance and an Nginx reverse proxy.
This first method is covered thoroughly and clearly in the LibreNMS installation documentation.
The second method is to use Docker Compose to deploy LibreNMS and its dependencies together in a set of networked Docker containers. This method provides a clean and approachable way to get started with LibreNMS.
This guide covers the second method, using Docker Compose. The following sections walk you through all of the necessary steps for getting LibreNMS running with Docker Compose on your system.
Install Docker and Docker Compose
You first need to install Docker and Docker Compose to be able to run LibreNMS as covered in this guide.
These next sets of steps show you how to install Docker with the Docker Compose plugin on Debian and Ubuntu and CentOS and Fedora systems. For other operating systems and distributions, refer to the official instructions for installing Docker Engine along with the Docker Compose plugin.
On Debian and Ubuntu
Remove any existing Docker installations.
sudo apt remove docker docker-engine docker.io containerd runcInstall the prerequisite packages for adding the Docker repository to the APT package manager.
sudo apt install ca-certificates curl gnupg lsb-releaseAdd the GPG key for the Docker repository to the APT package manager. Replace
debianin the URL in this command withubuntuif you are on an Ubuntu distribution.sudo mkdir -m 0755 -p /etc/apt/keyrings curl -fsSL https://download.docker.com/linux/debian/gpg | sudo gpg --dearmor -o /etc/apt/keyrings/docker.gpgAdd the Docker repository to the APT package manager. Again, replace
debianin the command’s URL withubuntuif you are on an Ubuntu distribution.echo "deb [arch=$(dpkg --print-architecture) signed-by=/etc/apt/keyrings/docker.gpg] https://download.docker.com/linux/debian $(lsb_release -cs) stable" | sudo tee /etc/apt/sources.list.d/docker.list > /dev/nullUpdate the APT indices, and install the Docker Engine along with the Docker Compose plugin.
sudo apt update
sudo apt install docker-ce docker-ce-cli containerd.io docker-buildx-plugin docker-compose-plugin
CentOS and Fedora
Remove any existing Docker installations.
sudo dnf remove docker docker-client docker-client-latest docker-common docker-latest docker-latest-logrotate docker-logrotate docker-selinux docker-engine-selinux docker-engineInstall the core plugins for the DNF package manager. These give you access to tools for managing DNF repositories.
sudo dnf -y install dnf-plugins-coreAdd the Docker repository to the DNF package manager. Replace
centosin the URL in this command withfedoraif you are on a Fedora distribution.sudo dnf config-manager --add-repo https://download.docker.com/linux/centos/docker-ce.repoInstall the Docker Engine along with the Docker Compose plugin.
sudo dnf install docker-ce docker-ce-cli containerd.io docker-buildx-plugin docker-compose-pluginYou may be prompted to verify the GPG key, and you should see the following key listed.
060A 61C5 1B55 8A7F 742B 77AA C52F EB6B 621E 9F35
Complete the Installation
Following either installation path, you can ensure that the Docker daemon is running using the command below:
sudo systemctl status docker● docker.service - Docker Application Container Engine
Loaded: loaded (/usr/lib/systemd/system/docker.service; enabled; vendor preset: disabled)
Active: active (running) since Thu 2023-02-16 20:38:07 UTC; 1s ago
Docs: https://docs.docker.comIf it is not running (active), enable and start the Docker daemon with the following commands:
sudo systemctl enable docker
sudo systemctl start docker
Install LibreNMS via Docker Compose
With the Docker requirements installed, you can gather the LibreNMS setup and start running the LibreNMS containers on your system.
Create a directory for the LibreNMS Docker setup, and change into that directory. This guide creates a
librenms-dockerdirectory within the current user’s home directory.mkdir ~/librenms-docker/ cd ~/librenms-docker/Download the LibreNMS Docker repository as a zip archive, and unzip that archive.
You may first need to install the
wgetandunziptools. Both are typically available from the package manager on most Linux distributions.wget https://github.com/librenms/docker/archive/refs/heads/master.zip unzip master.zip(Optional) This guide uses the default Docker Compose setup for LibreNMS. Generally, the default setup covers many use cases and is especially useful for starting out with LibreNMS.
However, this is where you can customize the Docker Compose deployment before starting up your LibreNMS instance. You would do so by modifying the
librenms.envanddocker-compose.ymlfiles within thedocker-master/examples/compose/directory.Refer to the librenms/docker documentation for thorough coverage of supported environment variables and configuration options.
Change into the directory containing the Docker Compose configuration —
docker-master/examples/compose— and run thedocker compose upcommand to start running LibreNMS.cd docker-master/examples/compose sudo docker compose up -dTo allow external access to the LibreNMS interface, you should open port
8000on your system’s firewall. Refer to our Setting Up and Securing a Compute Instance guide for information on managing firewalls.Follow that guide to verify which firewall tool your system is using and to ensure that the tool is active. Then, use the commands below to open port
8000.Debian and Ubuntu typically include the UFW tool. Using it, you can open the port with the following command:
sudo ufw allow 8000/tcpCentOS, Fedora, and similar distributions typically include the firewalld tool. Using it, you can open the port with the following commands:
sudo firewall-cmd --zone=public --add-port=8000/tcp --permanent
sudo firewall-cmd --reload
How to Use LibreNMS
Your LibreNMS instance is now running on your system’s port 8000. Open the interface in your web browser by navigating to that port on your system’s public IP address.
For instance, if your system’s public IP address is 192.0.2.0, you would navigate to 192.0.2.0:8000 in your web browser.
The interface directs you to conduct the initial setup the first time you access it. Follow along with the next section to walk through that setup, and then read further on for details on using and navigating LibreNMS for monitoring.
Complete the Setup
Upon first accessing the interface, LibreNMS presents you with a form to create an administrator user for the instance. Do this by providing a username, password, and email address for the administrator user on the instance.
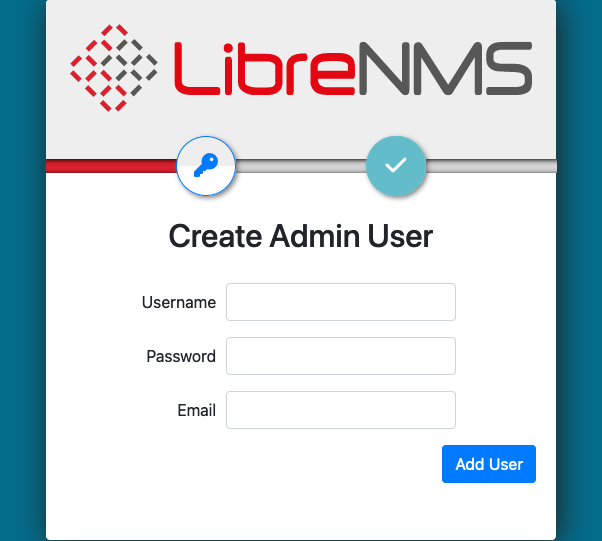
From there, select the checkmark button at the top of the page to navigate to the last setup step. Indicate the features you would like, and select the Finish Install button to complete the initial setup.
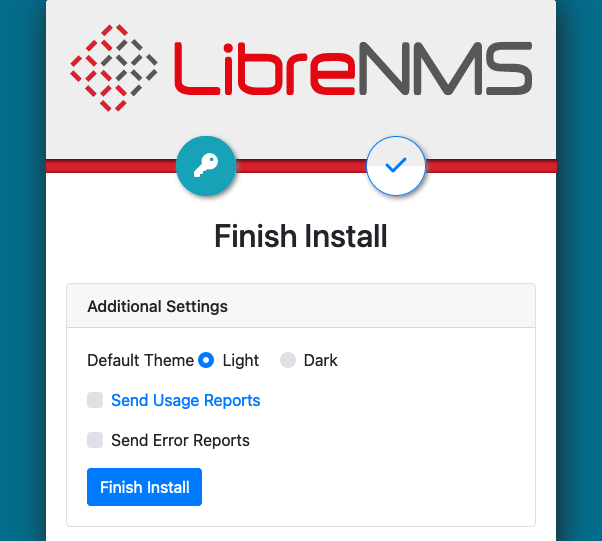
The interface takes you to the login page, where you can log in using the administrator user you created. This takes you to the validation page, with an overview of system features LibreNMS has been able to verify.
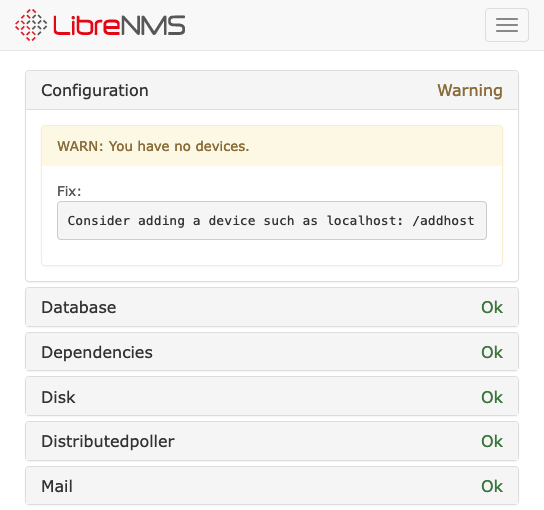
Deploy a LibreNMS Agent
To start monitoring, you first need a LibreNMS-compatible agent on the system you want to monitor.
This section of the guide shows you how to set up an agent. Specifically, this section walks you through installing SNMP on your system and deploying LibreNMS’s distro agent to get information about the distribution.
The easiest system to start with this is the one running LibreNMS, which is what this guide assumes. However, you can also take these steps on another system as well to prepare it for LibreNMS monitoring.
Afterward, follow along with the next section to connect to the device from within LibreNMS.
Install SNMP to your system. This protocol allows LibreNMS to get information about the system.
On Debian and Ubuntu, install the SNMP tools with the following command:
sudo apt install snmp snmpdOn CentOS, Fedora, and similar distributions, install SNMP tools with the following command:
sudo dnf install net-snmp net-snmp-utils
Customize the SNMP configuration, located at
/etc/snmp/snmpd.conf. For this guide, you should replace the default configuration with the example configuration you can find within the LibreNMS repository.sudo mv /etc/snmp/snmpd.conf /etc/snmp/snmpd.conf.old sudo curl -o /etc/snmp/snmpd.conf https://raw.githubusercontent.com/librenms/librenms/master/snmpd.conf.exampleOpen that configuration file, and replace
RANDOMSTRINGGOESHEREwith a community name for the SNMP instance. The default for the Docker installation islibrenmsdocker, which is what this guide assumes. But you can use whatever community name you would like.Replace the information in the
syslocationandsyscontactlines with the information you would like to associate with the system. The example configuration includes descriptive placeholder values to guide you, but you can alter these fields how you wish.Download the
distrobinary, which provides distribution information via SNMP, and make the binary executable.sudo curl -o /usr/bin/distro https://raw.githubusercontent.com/librenms/librenms-agent/master/snmp/distro sudo chmod +x /usr/bin/distroDownload the
librenms-agentrepository. You may first need to install Git through your system’s package manager.git clone https://github.com/librenms/librenms-agent.gitCopy the
check_mkagent from the repository into your system’s path, and give it executable privileges.sudo cp librenms-agent/check_mk_agent /usr/bin/check_mk_agent sudo chmod +x /usr/bin/check_mk_agentCopy the
check_mkservice into a systemd service location.sudo cp librenms-agent/check_mk@.service check_mk.socket /etc/systemd/systemCreate a directory for the
check_mkagent’s script files and plugins.sudo mkdir -p /usr/lib/check_mk_agent/local /usr/lib/check_mk_agent/pluginsThe LibreNMS agent includes a number of monitoring scripts that can be used by the
check_mkagent. These scripts are located in theagent-local/directory of the agent repository.Move those of the scripts you want to use into the
/usr/lib/check_mk_agent/local/directory and give them executable privileges. This example copies all of the agent script files.sudo cp librenms-agent/agent-local/* /usr/lib/check_mk_agent/local/ sudo rm /usr/lib/check_mk_agent/local/README sudo chmod +x /usr/lib/check_mk_agent/local/*Enable and start the
snmpdservice and thecheck_mkLibreNMS agent.sudo systemctl enable snmpd sudo systemctl enable check_mk.socket sudo systemctl start snmpd sudo systemctl start check_mk.socket
Add a Device to LibreNMS
Once you have SNMP and an agent deployed on the system you want to monitor, you can add that system within the LibreNMS interface.
Access the LibreNMS interface as covered further above.
Navigate to Devices > Add Device from the menu at the top of the page. This takes you to a form for adding a new device to LibreNMS.
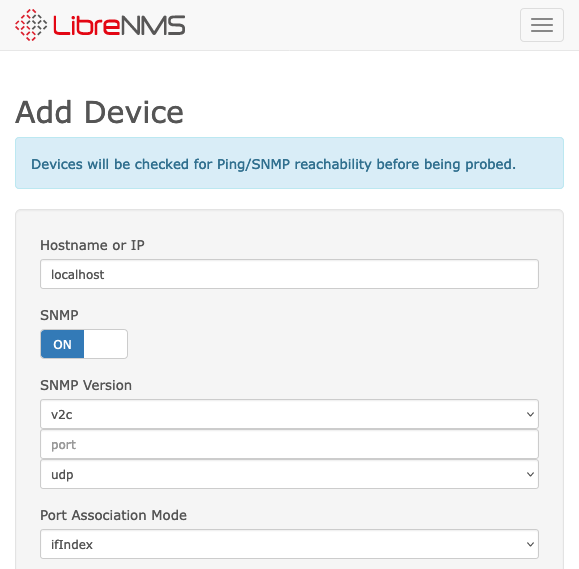
Complete the form for adding a new device with the information as follows.
Enter the public IP address for the system in the Hostname or IP field.
Enter
librenmsdockerfor the Community field, or whatever community value you provided within the SNMP configuration.Leave all other settings at their default values.
Select the Add Device button to add the system to your LibreNMS instance.
Monitor Devices
Now you should be able to review information about the device within the LibreNMS interface.
Access the Devices > All Devices option from the menu at the top of the page. You may first have to refresh the page or navigate to another page.
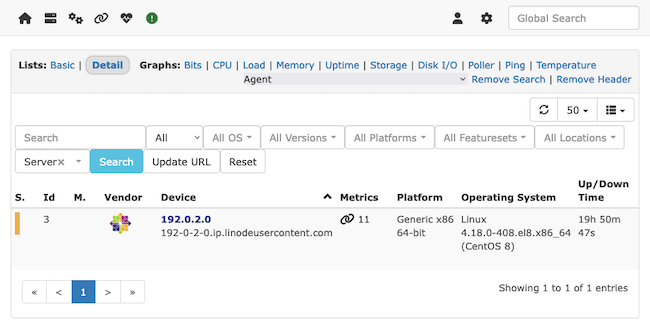
The resulting page lists all of the devices you have connected to the LibreNMS instance.
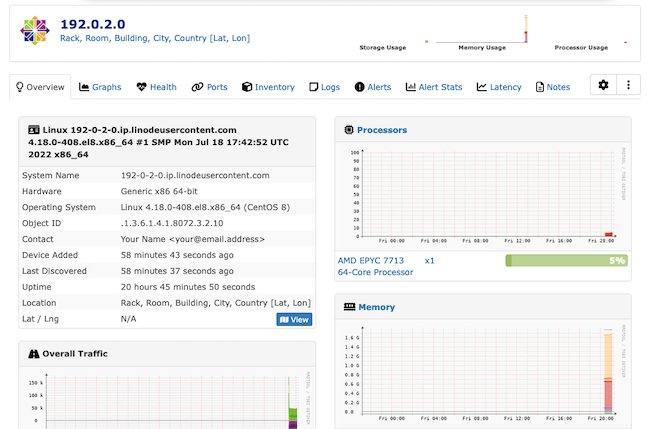
Selecting the device takes you to a page with extensive information about the system and its performance.
The tabs provide you with a range of areas to review the device on. Having set up the LibreNMS check_mk agent, you should be able to find a range of automatically discovered applications within the Apps tab.
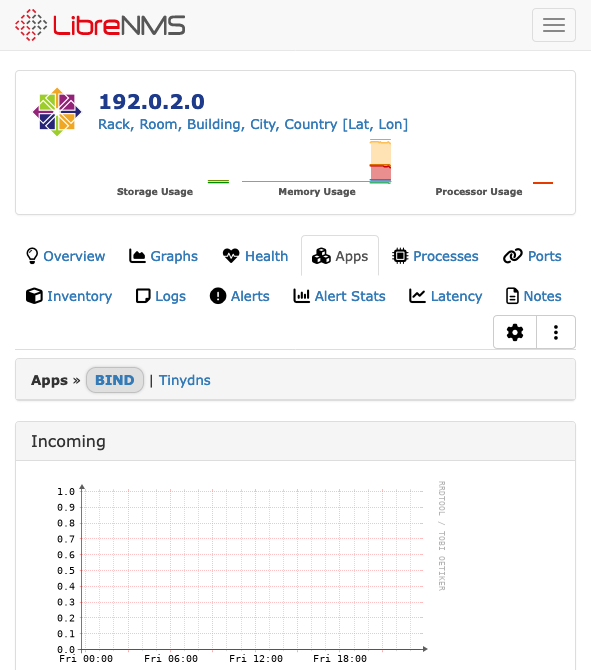
You can use the cog icon from the upper right of the device page to manage the device within LibreNMS. From here, you can start extending your monitoring into LibreNMS’s many other features.
For instance, use the Alert Rules tab to add alert conditions for the device. LibreNMS provides an option for setting up a default set of alert rules, but you can also create completely custom rules.
Conclusion
This guide covers everything you need to start running and making the most of LibreNMS on your system. There is plenty more to build on from here though. Be sure to peruse the official documentation links below to begin customizing your LibreNMS instance to fit your needs. And from there you can learn more about LibreNMS’s wide set of features and how to incorporate them.
More Information
You may wish to consult the following resources for additional information on this topic. While these are provided in the hope that they will be useful, please note that we cannot vouch for the accuracy or timeliness of externally hosted materials.
This page was originally published on
