


One of our customers that handles sensitive customer data needed a secure cloud infrastructure for their web apps and databases. We implemented a NAT Gateway in a VPC to allow instances in private subnets to access the internet for updates and API calls while blocking inbound traffic. This solution provides internet access to private instances without exposing them directly to the public internet, enhancing security. Here’s what we did:
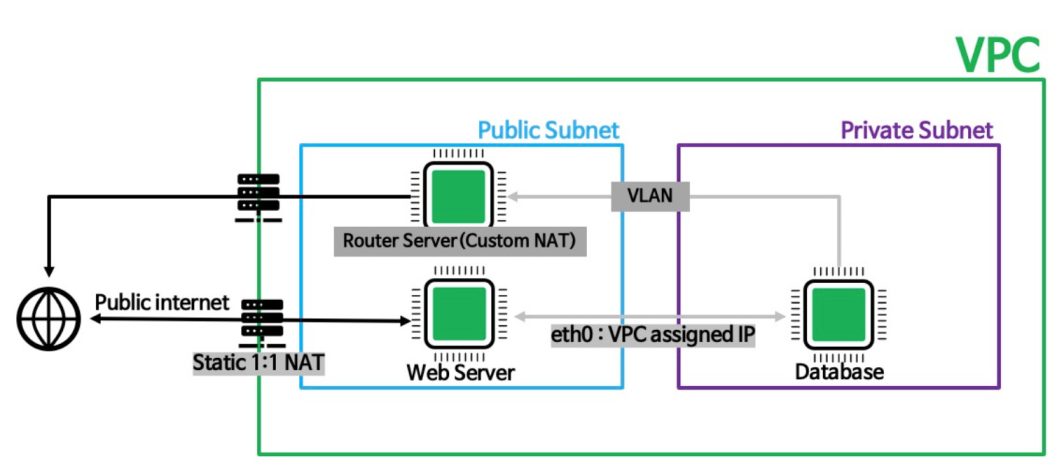
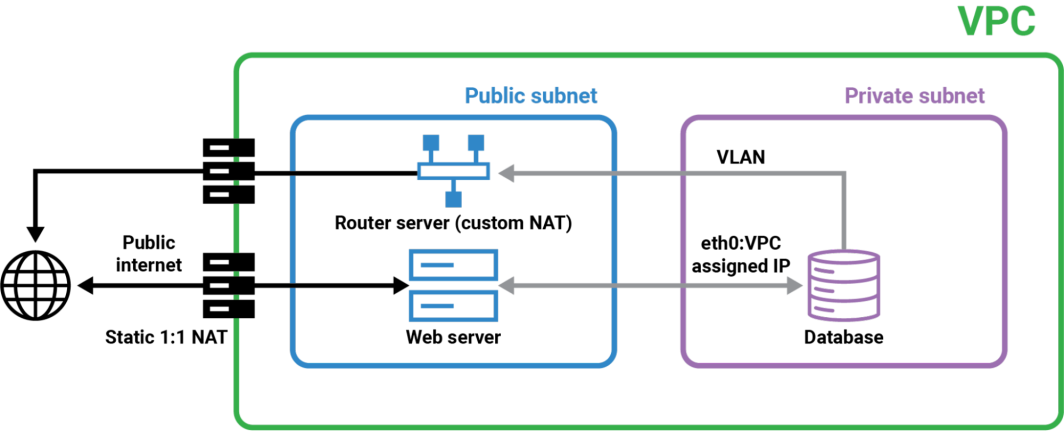
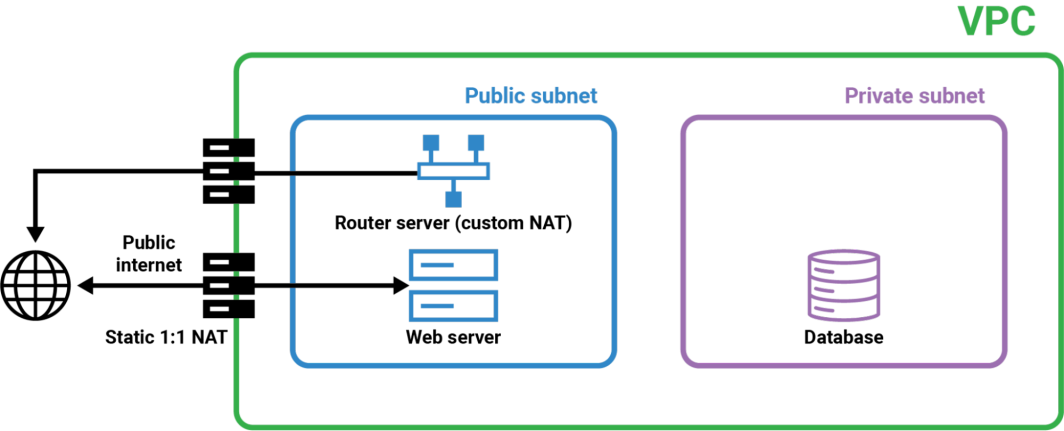
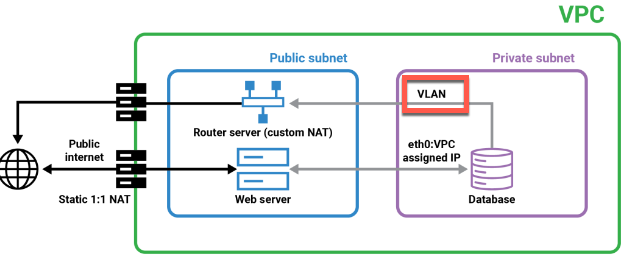
This diagram illustrates a typical VPC setup divided into three main sections: VPC, public subnet, and private subnet. First we have the outer green box, the VPC, which isolates the resources within it from other networks. Users access the web server through the public internet using a static IP address assigned via 1:1 NAT. The web server processes the requests and, if necessary, communicates with the database server. The web server communicates with the database server through the Router Server. The Router Server uses Custom NAT to securely route traffic between the public and private subnets. The database server, located in the private subnet, receives requests from the web server through the VLAN. The private subnet’s isolation ensures that the database server is not directly exposed to the internet, enhancing security. In this tutorial, we will walk through the steps to set up this architecture, ensuring secure and efficient communication between the private and public subnets. We’ll create a VPC with a public and private subnet, configure the NAT Gateway, and set up the VLAN.
Tutorial
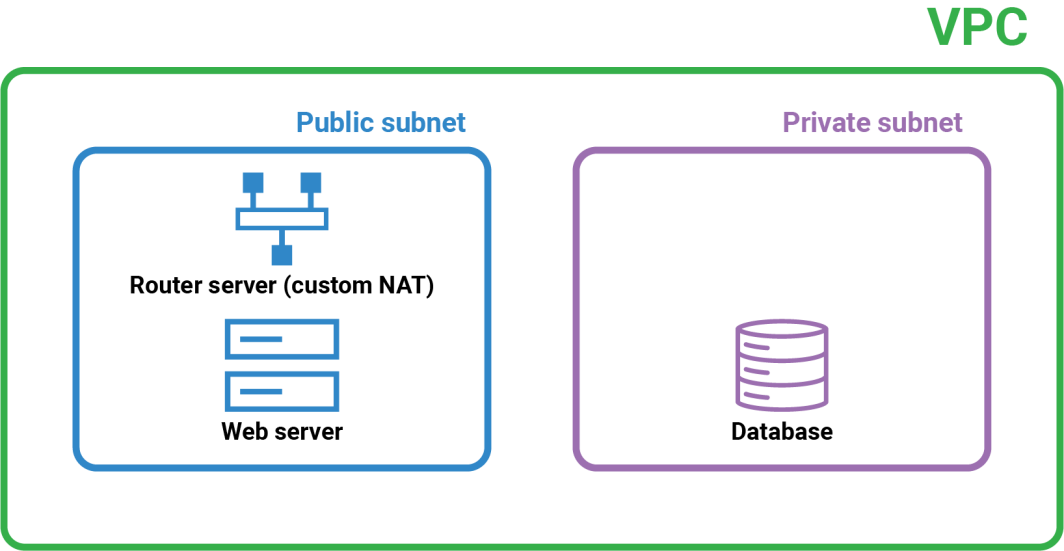
In this tutorial, we will be creating a NAT Gateway in a VPC, just like the diagram we just went through. If you already have a Linode account, you can slip ahead to step 1. If you don’t have a Linode account, use this link to sign up and get $100 in free credits to go through the following steps. From the Linode Dashboard, we are going to create a VPC with two subnets: a public subnet and a private subnet. In the private subnet, we’ll add a database, and in the private subnet, we will add 2 instances: one that will act as the web server, and one that will act as the router server (custom NAT).
Step 1: Create a VPC
The first step to building a NAT Gateway in a VPC is to create the VPC to logically isolate our resources. Recall that this is the green box from the diagram we went through. The private and public subnets will live inside of this VPC.
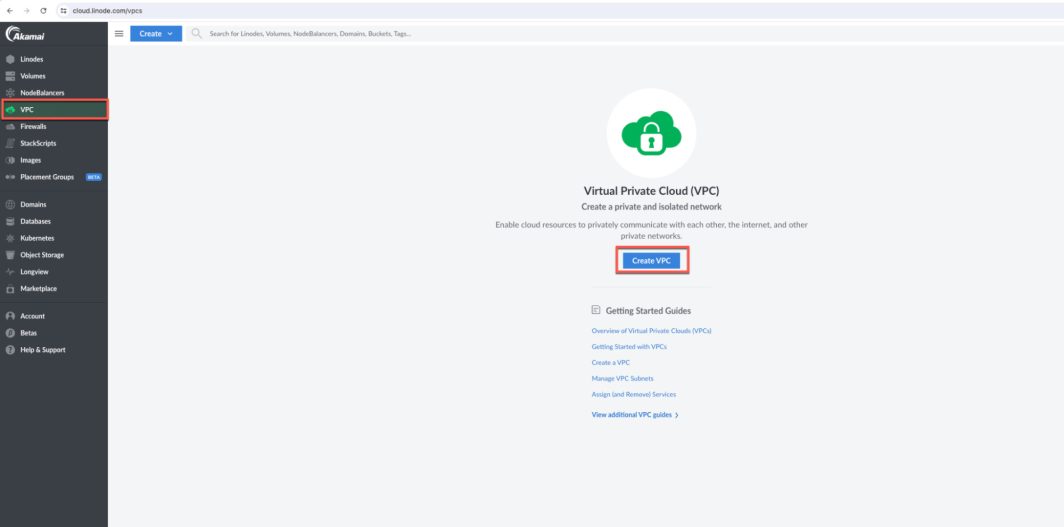
To do this, from the Linode Cloud Manager, click on VPC on the left panel, then click on Create VPC.
Step 2: Set up the Public Subnet
Next, we need to add a public subnet in the VPC that will hold the router server (custom NAT) and the web server. Recall that this is the blue square from the diagram we went through.
On the bottom of the screen, where it says Subnets, add a label for the public subnet. This subnet will host the Router Server (Custom NAT) and the Web Server.
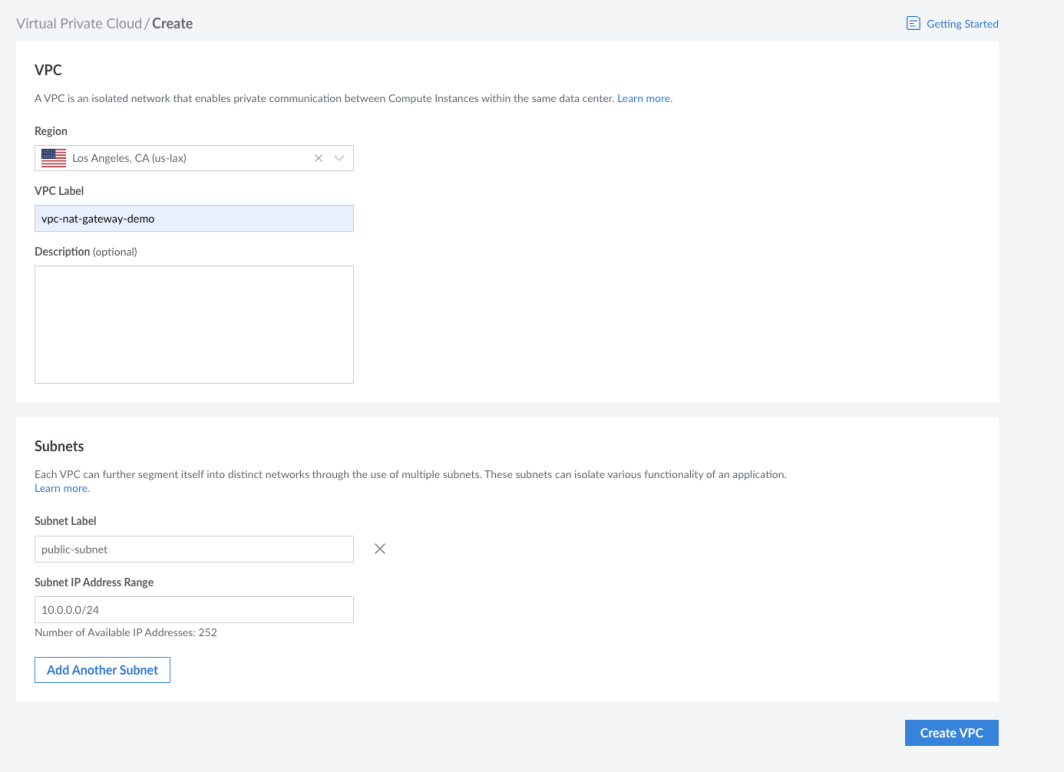
Then click on Create VPC to provision the VPC.
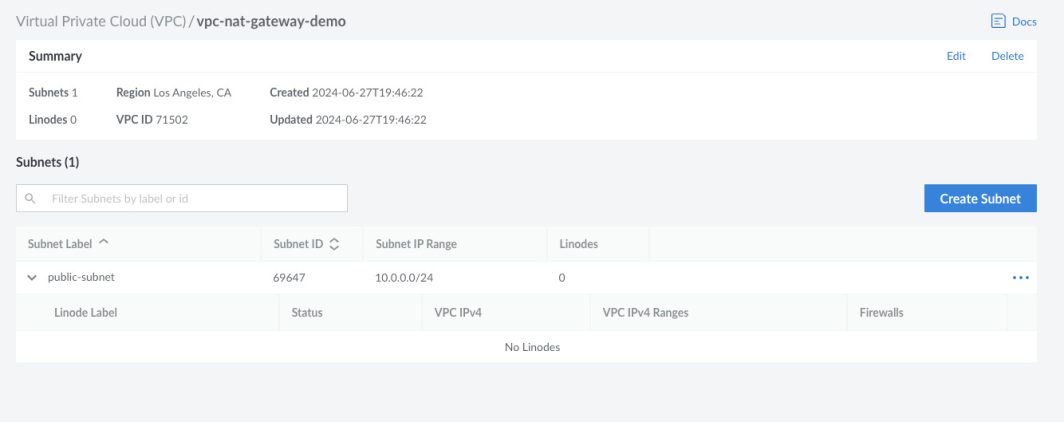
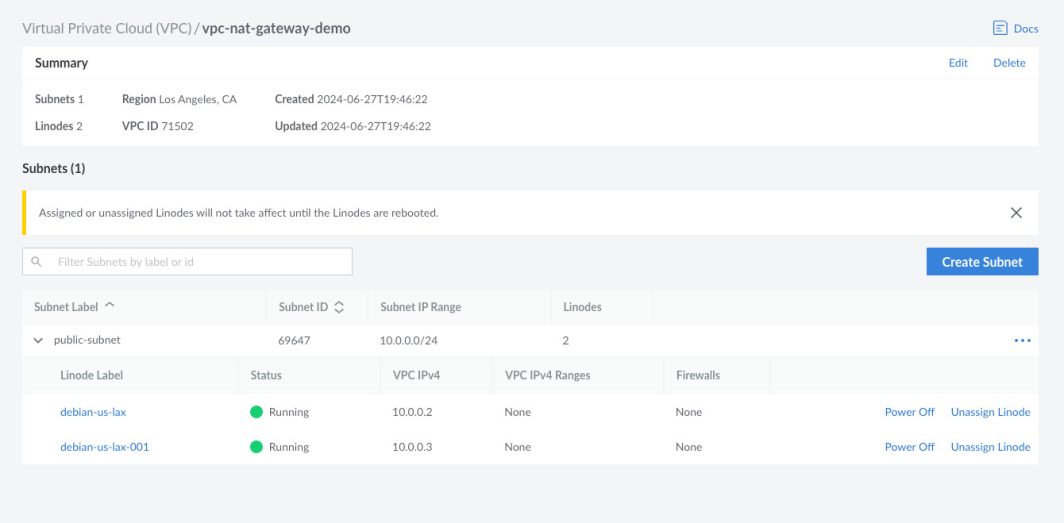
You will see the public subnet created with the corresponding subnet ID and IP range.
Step 3: Deploy the Router Server and Web Server
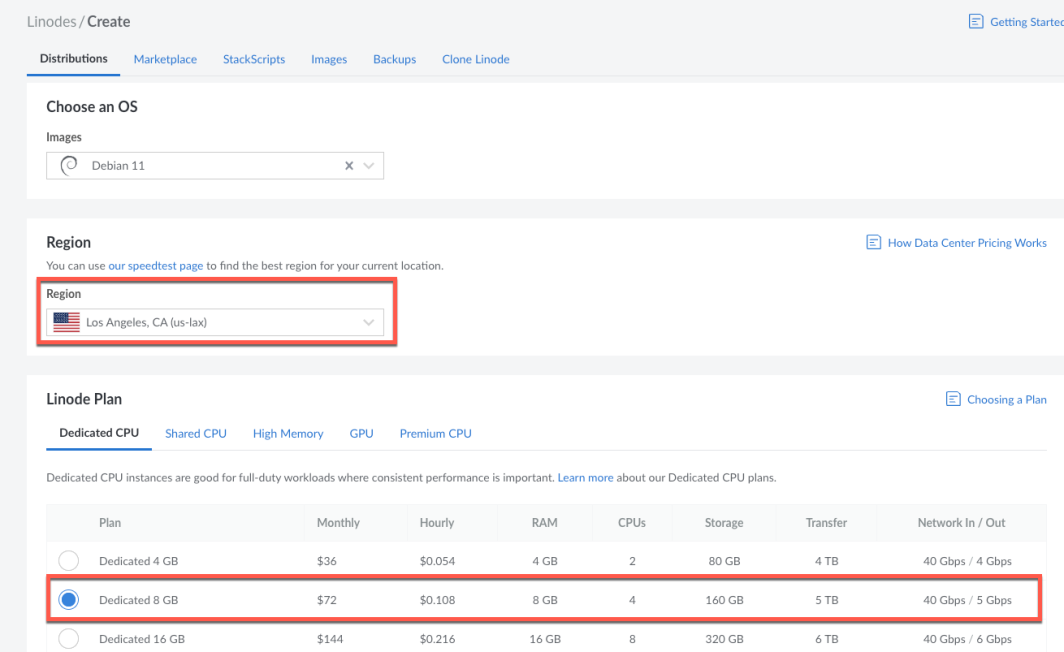
Next, we need to deploy 2 Linode instances in the public subnet. One Linode instance will act as our router server (custom NAT), that will handle NAT operations to manage traffic between the public and private subnets. The other server will act as the web server to handle incoming traffic from the internet and forward necessary requests to the private subnet. First, we will create the router server. From Cloud Manager, click on Linodes on the left panel, then click on Create Linode. Choose the same region you chose when you created the VPC, and then select the Dedicated 8 GB CPU option.
Then, scroll down and assign the VPC you created in Step 1, and then choose the public subnet from the dropdown.
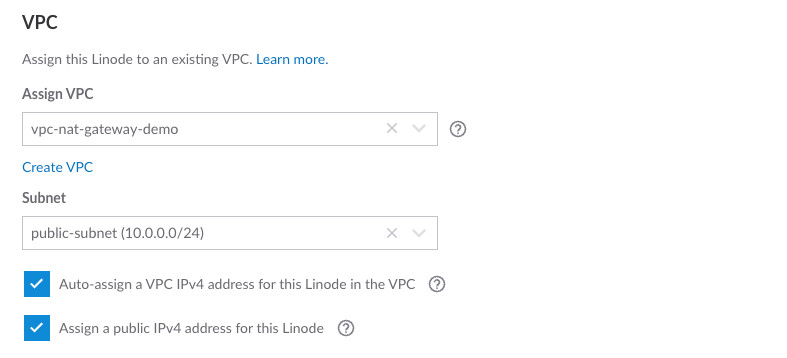
Click on Create Linode to finish provisioning this instance.
Now, let’s create the web server, using the same process as above. Click on Create Linode, select the region you chose for your VPC, and then assign the VPC to this instance. You will now see both the web server and the router server listed in the VPC under the public subnet.
Step 4: Create a Private Subnet
Next, we need to create the private subnet within the VPC to host the database server, which will not have direct access to the public internet. We are now building the purple box.
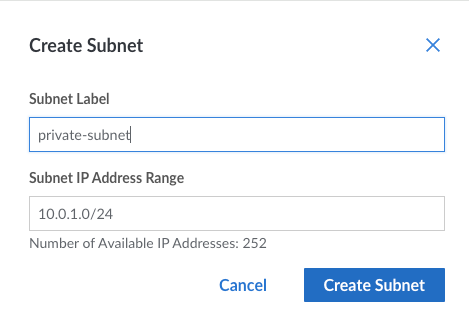
From your VPC, click on Create Subnet and then enter a label, and assign the private IP range. This subnet keeps your database securely tucked away from any external threats.
Step 5: Deploy the Database Server
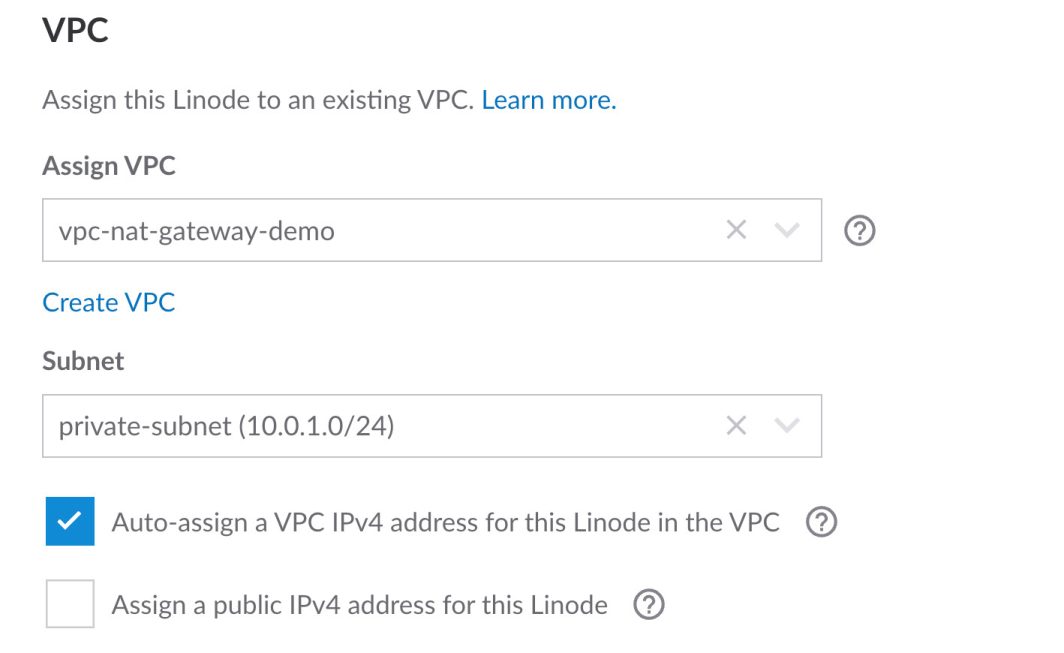
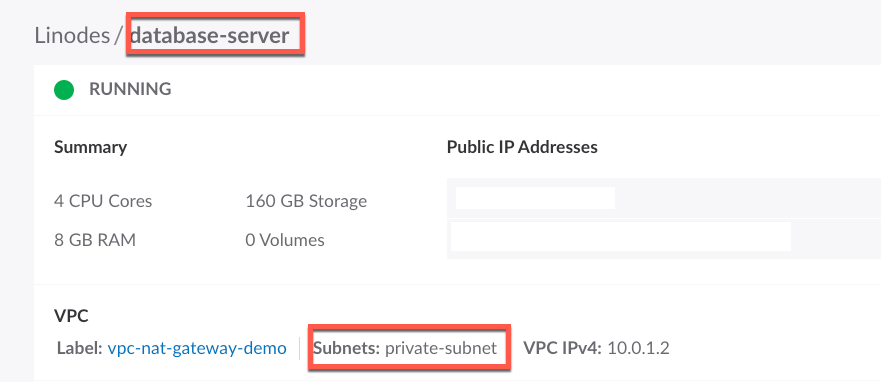
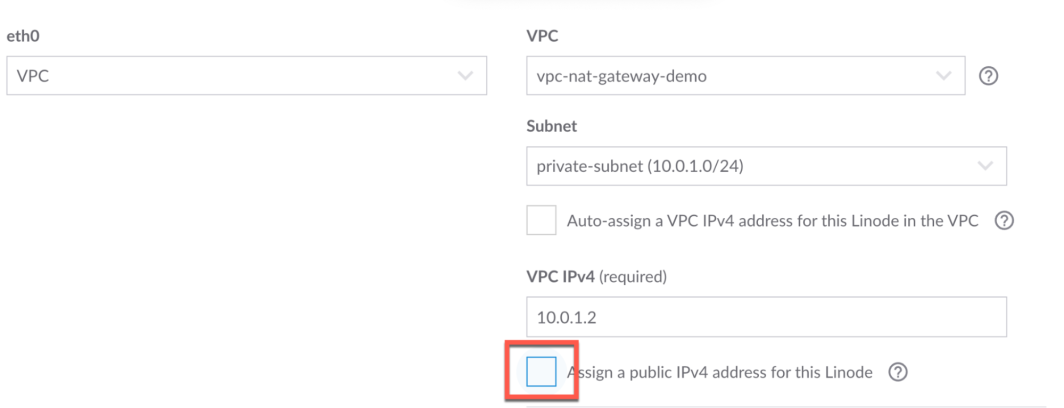
Now, let’s deploy a Linode instance in the private subnet to serve as our database server. This instance will only be accessible from the public subnet via the secure VLAN. From the left panel on the Linode Cloud Manager, click on Linodes, then click on Create Linode. Enter database-server as the label, choose vpc-nat-gateway-demo as the VPC, and choose private-subnet as the subnet.
Once this server is deployed, you should see the following:
Next we need to edit the configuration and check the box to Assign a public IP address for this Linode. The reason we do this is because we need to download network tools from this server.

Step 6: Configure VLAN
Next, we need to establish a VLAN to enable secure communication between the public and private subnets. The database server and the router server can talk to each other with the VLAN.
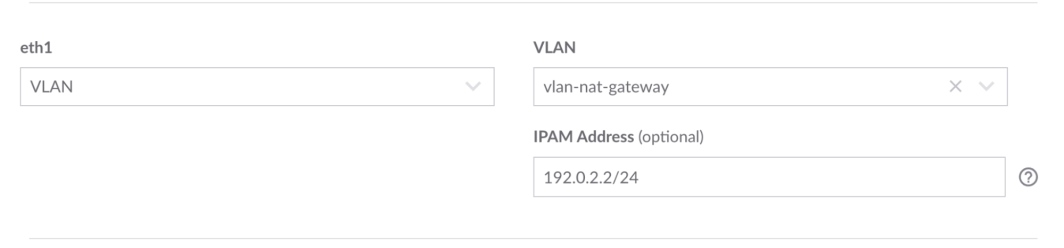
This ensures that traffic between the web server and the database server remains private and secure. From the router server, click on the Configurations tab, then click on Edit. Add a VLAN, and enter an address (use the placeholder text as guidance).
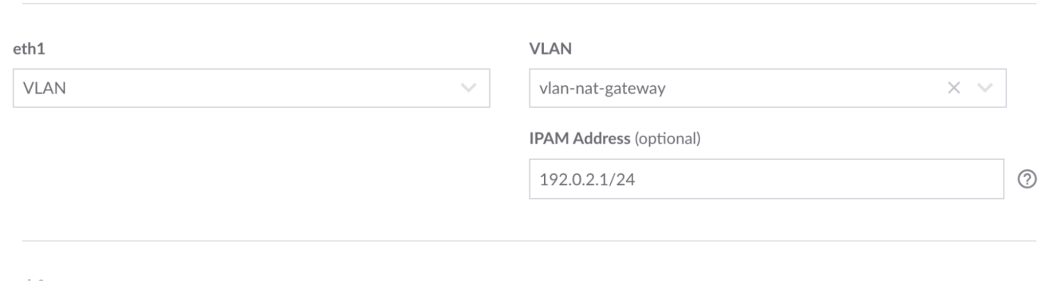
Now, let’s go to the router server and add that VLAN to the configuration.
Step 7: Forward traffic from the database server to the router server
Recall that we assigned a public IP so we can access the internet to download some network tools.
Now, let’s download ipconfig using the following commands:
$ modprobe iptable_nat
$ echo 1 > /proc/sys/net/ipv4/ip_forward
$ iptables -t nat -A POSTROUTING -o eth0 -j MASQUERADE
$ iptables -A FORWARD -i eth1 -j ACCEPT
Next, we need to go back to the database server and remove the checkbox for public IP so that it doesn’t have internet access.
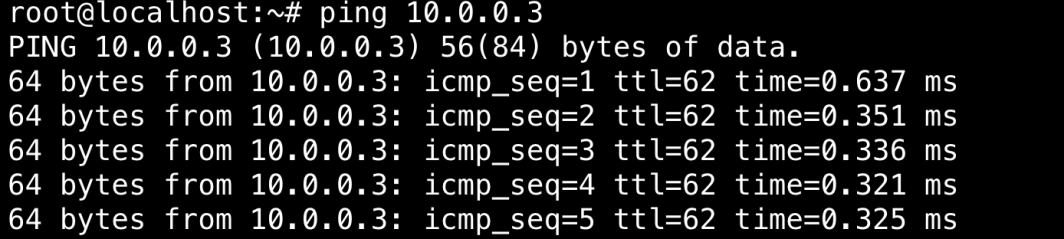
The database server is now securely isolated in the private subnet. It will now be able to talk to the router server. Let’s ping the VPC of the router server.
Next, we need to have the database server route traffic over VLAN. To do that, run the following command from the database server:
route add default gw {VLAN-IP-FOR-ROUTER}
Then, run route.

You will see the VLAN listed here.
Now we need to configure the router server to forward traffic from eth1 (VLAN) to the internet. In this step, we are enabling NATing on the server and enabling IP forwarding.
From the router server run these commands:
$ modprobe iptable_nat
$ echo 1 > /proc/sys/net/ipv4/ip_forward
$ iptables -t nat -A POSTROUTING -o eth0 -j MASQUERADE
$ iptables -A FORWARD -i eth1 -j ACCEPT
We have successfully setup a NAT Gateway in a VPC.
Advantages of this Architecture
There are a couple of key advantages of using this architecture. First, you get enhanced security. A VPC allows for the isolation of resources within distinct subnets (public and private). A NAT gateway ensures that instances in private subnets can access the internet without exposing them directly to public internet threats. By using a NAT Gateway in a VPC, only outbound traffic is allowed from private instances to the internet, preventing unsolicited inbound connections that could pose security risks. We put the database inside the private subnet, and the sensitive items here are shielded from direct internet exposure, reducing the risk of data breaches.
This architecture also greatly enhances scalability. NAT gateways are designed to manage substantial volumes of traffic and can automatically adjust to increasing demands, eliminating the need for manual intervention. As the traffic load grows, the NAT gateway scales its resources to maintain optimal performance and ensure continuous availability. This automated scalability is particularly beneficial for e-commerce platforms, which often experience fluctuating traffic patterns due to seasonal sales, promotions, and varying customer behaviors. By leveraging NAT gateways, developers can ensure their applications remain responsive and reliable, even under high demand, ultimately providing a better user experience and supporting business growth.
Building a NAT gateway in a VPC using Linode provides a secure and efficient way to manage network traffic between public and private resources. It ensures that your private instances can access the necessary external resources while protecting them from direct internet exposure, ultimately enhancing the security, scalability, and efficiency of your cloud infrastructure.
By following the steps outlined above and using the provided diagram as a reference, you can not only protect your customers’ sensitive data but also optimize your network performance. If you are a developer looking to optimize your cloud security and you want to build more resources in the cloud, use this link to apply for up to $5,000 in Linode credits.


Comments (6)
how can i create a linode account
i tried to register and got rejected
Hello Linh – If you’re having trouble creating an account, we suggest completing the form below and choosing the option that says, “I received a Signup Cancellation email when creating an account”:
https://www.linode.com/support/contact/
This post from the Linode Community Questions site titled “My signup was flagged as “fraudulent behavior” has more information. Keep in mind, you’ll only hear back from us if we decide to overturn our initial decision.
Hi, thank you for the write up, but I think there is an issue with this article. In step 6 when you are configuring the VLAN you label both the configuration of the Database and Router Server as the Router Sever. “From the router server, click on the Configurations tab…” and then later on in the same step you say, “Now, let’s go to the router server and add that VLAN to the configuration.” I assume first is the VLAN configuration for the database (192.0.2.2/24) and the second is for the router (192.0.2.1/24).
Hi Dane – We appreciate you pointing out that redundant statement! In case they were not aware, I have forwarded this feedback to the team responsible for our documentation so they may make the necessary changes.
Please recheck step 7. it is wrong. please do a better job at proof reading.
Hi Ajit – We appreciate you catching that redundant sentence! In the event that they were unaware, I have forwarded this feedback to the team responsible for our documentation so they may make the necessary changes.